How To Collect, Preserve, And Make Snowflakes
An excerpt from “Mama Gone Geek.”
The following is an excerpt from Mama Gone Geek, by Lynn Brunelle.
Collect Snowflakes
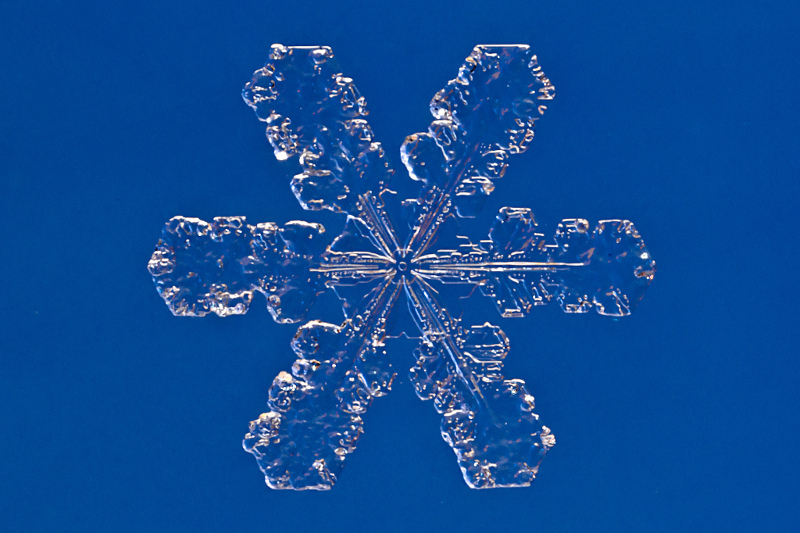
When the snow starts falling, grab your kids, coats and boots, a couple of pieces of black construction paper, and a magnifying glass or two if you have them. As the snow is falling around you, catch a couple of snowflakes on your black construction paper and observe them with your magnifying glass, comparing how the snowflakes are similar and different. Count how many sides or points the snowflakes have and if any snowflakes appear to match.
Preserve Snowflakes
If you happen to have a microscope and microscope slides, try preserving snowflakes. All you really need for this activity are the slides, but using a microscope is a fun bonus. Prepare in advance by placing a couple of slides in the freezer so that they won’t melt the snowflakes. You will also need hairspray or artists’ fixative. Keep these items in a cold area like your refrigerator or an unheated garage.
When it is time to collect and preserve snowflakes, bring out the slides, the hairspray, and a couple of toothpicks. Spray one side of the slides with the hairspray. Catch the snowflakes on the sticky side of the microscope slides, using a toothpick to gently move the snowflake to center it, if needed. Place the slide with the snowflake in a cold area where no more snowflakes will fall on it, such as inside a covered box or in the unheated garage. Leave the slide untouched for several hours so that the hairspray can dry and the water in the snowflake will disappear. You now have the imprint of a snowflake on a slide you can study with the naked eye or a microscope.
Make Borax Snowflakes
If you do not have snow where you live, no problem. Just make your own borax snowflakes. This activity takes about 30 minutes of active preparation and then overnight to grow.
What You Need
• Wide-mouth jar
• 3 pipe cleaners
• String
• Scissors
• A pencil
• Water
• 1-cup measuring cup
• Tablespoon
• Borax (look for it in the laundry detergent aisle at the store)
• Food coloring (optional)
• Ribbon (optional)
What You Do
1. Make the flake base. Twist together three pipe cleaners in the center to make a six-pointed star. Use scissors to trim down the ends of the pipe cleaners so they are all approximately the same length and can fit in the jar.
2. Tie a piece of string to one end of the star. Connect the string to the next point by twisting it around the pipe cleaner. Continue around until you connect all the points together with the string, making a snowflake skeleton.
3. Tie another piece of string to one of the pipe cleaner points, and tie the other end around the pencil. Place the snowflake in the jar with the pencil resting across the mouth of the jar to make sure that the snowflake hangs without touching any part of the jar. Take the snowflake out of the jar.
4. Make the solution. Measure out how many cups of water are needed to fill the jar. Use a teakettle or microwave to boil the water. For every cup of water placed in the jar, mix in three tablespoons of borax. This will make a saturated borax solution. Stir the borax solution with a spoon until as much of it dissolves as possible.
5. Create the crystal. Hang your snowflake in the jar so it is completely covered in the solution. Let it sit overnight. Gently remove your now crystal-covered snowflake in the morning and let it dry by hanging it in a dry jar.
Keep going…
• To make colored snowflakes, use colored pipe cleaners and add 1 or 2 drops of food coloring in Step 4.
• To make your snowflakes glow in the dark, paint the pipe cleaner snowflake with glow-in-the-dark paint in Step 2. Let it dry completely before going on to Step 3.
• Tie a ribbon to one point of your snowflake to make a Christmas tree ornament!
Awesome Six-Sided Paper Snowflakes
Everyone knows how to make paper snowflakes, right? But most people make flakes with four or eight sides. Since real snowflakes always form six-sided flakes, here is a step-by-step guide to folding the paper so you get six points every time.
What You Need
• Scissors
• White copy paper 81/2 x 11″
What You Do
1. Start with a square piece of paper. (I used copy paper. To make a square from a standard sheet of copy paper, fold one side down to make a triangle and cut off the excess strip.)
2. Fold the square diagonally to make a triangle.
3. Fold the triangle in half to make a smaller triangle.
4. Fold the triangle in thirds (see illustration).
5. Cut off the top off at an angle (see illustration).
6. Cut shapes from the sides of the triangles.
7. Unfold the paper gently.
Excerpted with permission from Mama Gone Geek, by Lynn Brunelle, © 2014 by Lynn Brunelle. Reprinted by arrangement with Roost Books, an imprint of Shambhala Publications, Inc., Boston, MA.
Lynn Brunelle is author of Mama Gone Geek (Roost Books, 2014) and an Emmy Award-winning TV Writer (Bill Nye the Science Guy) in Seattle, Washington.